
Sunday, October 20, 2013
Creative placement of spooky wall decal
Kennedy had the great idea of putting the wall decal over the door so you see it in the mirror when you go to wash your hands. It works perfectly!


Saturday, October 19, 2013
Faux Boards for the windows and front door
Well, I didn't have enough monster mud leftover to treat the two columns so I focused on making some fake boards to apply to the front windows and door. I think they turned out very well and are extremely cheap to make.


A close-up of one end:


Supplies:
- black foam core with black foam (I bought mine at Michael's from the framing department; each sheet was 40"x60")
- wood grain contact paper (Home Depot)
- a black sharpie
- utility knife with new blade
Step 1) Apply the contact paper to the foam core. I wanted my boards to be 40" wide, so I applied the contact paper across the short side of the foam core so the grain ran the right way.
Step 2) Using the sharpie, go over the dark grain lines on the contact paper. Since these will be used outside, at night, this will make the boards stand out better and give them a weathered look. Don't worry about making the lines perfect since no one will be inspecting them up close.
Step 3) Decide how wide you want each board to be and the cut the foam core into the individual boards. Again, don't try to make the boards too straight since the crooked edges give them a more natural and spooky look. I used a framing triangle that ran along the top edge to give me a rough target of the width (3.5") but let the knife wander up and down to give a wavy edge.
Step 4) Notch the ends and cut out any knots in the middle of the boards to make them look even more weathered.
Let me know what you think!
One board without the sharpie treatment and one with:
Here are a few sample boards:
A close-up of one end:
The final stack:
Friday, October 4, 2013
Columns for the fence are underway
Building on Lisa's idea to extend the fence to include the driveway, I am we'll underway in fabricating two columns to support the fence ends and create an opening to allow trick or treaters to brave the graveyard. I wanted them to be sturdy enough to not fall over if they were bumped by retreating kids and also to prevent the faux rock from breaking. To accomplish this, I used 2x4s as the main structure and a laminate board for the top. I also included a removable panel to allow the addition of lighting or other electronics in the future. The two horizontal 2x4's visible will hold the 1x2 that extends outside the box to mount the fence to. I also used magnets and plates to hold the removable panel in place.


Then I glued foam boards onto the three fixed sides and the removable panel using gorilla glue that includes foam on the list of compatible materials. Once attached, I used a Sharpie to sketch out the design for the fake stones. Again, Lisa had some great suggestions on making sure the "stones" weren't too even or squared off.
You will hopefully notice that there is a fair amount of texture on the columns. This was added by hitting the foam randomly with different parts of the back of a utility knife. I thought about different tools but found this had a perfect range of shapes all built into one device which allowed me to achieve a random look.
After adding the texture and sketching out both columns, I proceeded to melt the "grout" lines. I initially tried using the low-temp tools I purchased specifically for these fabrication projects but it would have taken forever since the tool only melted a thin line with each pass. Then I switched to a higher temperature electronics soldering tool and it worked great! I held it at a very shallow angle and dragged it quickly back and forth to minimize any lines.
Next steps:
- beat up the edges of the boxes a bit more to make them less squared off
- melt out the holes for the fence mounting hardware
- apply monster mud
- paint the stones and add weathering effects (painting)
- paint and add fence mounting pieces
Friday, June 21, 2013
Build a flying crank ghost out of cheese-cloth and a rotisserie motor!
And I just happen to have purchased a new grill making my old rotisserie obsolete... Might have to add a prop to this year's list!!!
Tuesday, June 18, 2013
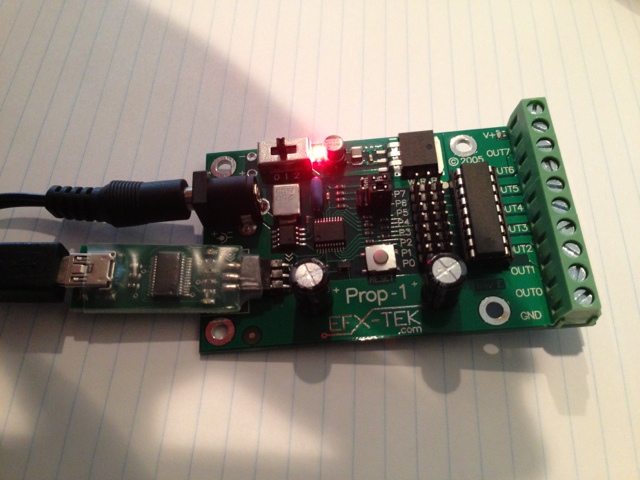
Getting started with Prop Controllers

Sunday, May 6, 2012
Very cool, royalty free sounds
One of my favorite finds at the National Haunters Convention was Audio Zombie Sound. They do custom work for movies, haunted attractions, and so on, but also sell a full line of royalty free sound libraries. I bought two CDs: Lost Souls - which they just released, and MY9D-FKD and am extremely impressed with their work! We listened through each track last night and rated them for our graveyard haunt in the front yard and have quite a few that will be playing on loop this coming year. This will be a significant upgrade from the generic "Freddy", "Jason", and "Psycho" theme songs that we have used in the past. The best part is each CD was only $10 - about what you would pay for the generic ones sold around Halloween!
Saturday, May 5, 2012
Don't miss it if you are in Philly this weekend!
I just spent the morning at the National Haunters Convention. There are a variety of vendors with everything from traditional store-bought props and costumes to high-end programmable logic controllers to make fancy animatronics. They also offer classes on making things out of styrofoam, marketing your haunted attraction, and how to keep your actors happy and motivated - among other things. I'll post more detailed notes of what I picked up for myself, but wanted to get the message out that the event is still going on for anyone who wants to stop by. Admission is $25 at the door.
http://www.nationalhauntersconvention.com/
http://www.nationalhauntersconvention.com/
Thursday, February 23, 2012
Future entrance for the graveyard?
Lisa had the great idea of expanding the graveyard we have used the last couple of years and having it include the front driveway as well. I saw this on the way home from the grocery store and thought it would make a good entrance with the fencing coming off either side. It should be pretty easy to make with wood internals, styrofoam walls, and Monster Mud finish. What do you think?

Wednesday, November 23, 2011
Storage - creative solutions...
I have gotten many questions about where I store all of this Halloween stuff the rest of the year. It is all about Volume! As in, don't just think about floor space. Here I use the fencing as a suspended shelf to hold the lighter props above my head in the basement.
Our ceilings are tall enough that I can easily walk under the fencing.
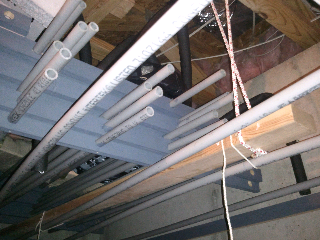

Our ceilings are tall enough that I can easily walk under the fencing.
Sunday, November 20, 2011
Post Halloween Update - Failure as a Blogger
Halloween has come and gone and while it was a big success (more on that later), I have a ways to go before I can call myself a true blogger. As the day got closer and closer I found myself with less and less time to update the blog. I think that is partially because I was looking at the blog as more of a project archive rather than a way to share fun and interesting Halloween related things. So, as I play catch-up over the next couple of weeks I hope to refine my blogging style and maybe figure out a way to keep this somewhat more active!
Saturday, October 8, 2011
6' Armature is complete!
I mentioned it in a previous post, but now have the video and pictures to share. I will probably end up using screws to secure several of the joints together. Once I added the foam to the arms and legs and then added the clothes, there is more tension on the joints. I also ordered two new hands since I only had the one shown in the picture... They look good, but are too white so I will have to paint them a bit to make them match the mask a little better.


Coffin is complete! (for this year anyway)
I used 3/4" Pine plywood (three 4x8 sheets) and the plans at the following address:
http://wayneofthewoods.com/coffin%202.html
My joints aren't quite furniture grade, but it is very sturdy and will look great in the graveyard. Before next year I will probably stain it and either add a cross to the lid or possibly cut a cross into the lid... This took much less time that the 6' Armature since I had all the right tools:


http://wayneofthewoods.com/coffin%202.html
My joints aren't quite furniture grade, but it is very sturdy and will look great in the graveyard. Before next year I will probably stain it and either add a cross to the lid or possibly cut a cross into the lid... This took much less time that the 6' Armature since I had all the right tools:
- Table saw to cut the angles on the side boards
- Circular saw with straight edge to cut the top, bottom, and sides
- Hand plane to make the joints relatively tight
- Corded drill with countersink drill bits
- Cordless drill
- Speed triangle to keep things square and calculate the angles (which all matched what were listed on the website!


Wednesday, September 28, 2011
Update . . .
The torso for the 6 foot armature is complete! It took two and a half large cans of crack sealer to completely cover the wire frame! I took a couple of videos that I will shorten down and post soon (assuming the quality is OK). I also have created the musculature for the arms and legs using an old mattress topper and some duct tape. I'll post the finished pictures once the crack sealer is dry.
Finally, I just ordered all of the supplies listed on my Zombie makeup tutorial post so I can make a practice run at that before Halloween. Expect a video in a couple of weeks...
Finally, I just ordered all of the supplies listed on my Zombie makeup tutorial post so I can make a practice run at that before Halloween. Expect a video in a couple of weeks...
Monday, September 19, 2011
6 Foot Armature
30 minutes seems to be my time allotment for Halloween projects...
I went to Home Depot on Saturday and bought materials for a bunch of projects:
- Grim Reaper Armature
- 6' Armature
- Coffin
- Modified Fog Chiller
- Tombstones
Here is the skeleton part of the 6' Armature, complete. It only took about 30 minutes to make this and about half of the Grim Reaper skeleton. Next is to add the chest and bulk up the arms/legs and finish the reaper skeleton. And don't worry, that isn't all neck, it will go to the top of the head inside whatever mask I am using on this dummy.

I went to Home Depot on Saturday and bought materials for a bunch of projects:
- Grim Reaper Armature
- 6' Armature
- Coffin
- Modified Fog Chiller
- Tombstones
Here is the skeleton part of the 6' Armature, complete. It only took about 30 minutes to make this and about half of the Grim Reaper skeleton. Next is to add the chest and bulk up the arms/legs and finish the reaper skeleton. And don't worry, that isn't all neck, it will go to the top of the head inside whatever mask I am using on this dummy.

Tuesday, September 13, 2011
Grim Reaper Project Update
I spent about 30 minutes working on the Grim Reaper modification tonight:
- removed the terrible fabrics and grass
- reshaped the skull and eye sockets
- replaced broken zip ties holding skull to frame
- found that the wingspan was only 6'! So, I removed the hands so I can lengthen the arms
- removed the blue LED eyes for now
Next up is to build the armature and sew the new cloak...

- removed the terrible fabrics and grass
- reshaped the skull and eye sockets
- replaced broken zip ties holding skull to frame
- found that the wingspan was only 6'! So, I removed the hands so I can lengthen the arms
- removed the blue LED eyes for now
Next up is to build the armature and sew the new cloak...
Monday, September 5, 2011
Project - Modifying store bought props: Grim Reaper
One of the easiest ways to get started on making your Halloween a bit spookier is to buy a prop and then look for ways to improve it! Take this skeleton for example:
 PROS:
PROS:
Plan:

- A full 10 feet tall!
- Features on face and hands are well defined
- Hangs on the wall (not very good for an outside prop)
- Flimsy white fabric and lightweight paper are neither scary nor durable
- Arms are too short and are made with bent wire that isn't hidden by the fabric
- "Grass" hair has to go
- Blue eyes just aren't that scary
Plan:
- Replace all of the fabric with black broadcloth (purchased 12 yds. on sale for $1.99/yd)
- Use a black open-weave specialty Halloween cloth for the hood (purchased 3 yds. on sale for $6.30/yd)
- Trash the grass
- Lengthen the arms to be more appropriate for his height
- Create a scythe to scale with wood, paint black, and place in his hand
- Make him free-standing, rather than needing to hang
- Optional (if time allows): replace Blue LEDs with Red
Tuesday, August 30, 2011
Halloween Treat Ideas in the September Williams-Sonoma Catalog
Check out the September Williams-Sonoma Catalog for some neat looking Halloween Treat ideas!
Williams-Sonoma Website
Williams-Sonoma Website
Sunday, July 24, 2011
Book Review - How To Haunt Your House, Book One
This Book by Shawn & Lynne Mitchell is a great place to get started if you are looking for ideas to create indoor or outdoor props. The price was a bit higher than I would have expected, and there were too many pages wasted on the inside with colorfully lit props without accompanying how-to instructions. But overall, it covers many of the basics of prop making including painting effects, lighting, and fog machines.
Most of the supplies and tools are readily available around your house and the rest can be easily picked up at your local hardware or craft store. (I recommend saving old paint, Styrofoam, and even dryer lint throughout the year so you are ready) I created a version of the Graveyard Fence described in the book for Halloween last year. It is amazing how much of a difference a fence can make in the overall effect of your yard decorations without too much cost. More on that later...
Saturday, July 16, 2011
Liquid Latex - How To Video
Zombie Makeup Tutorial #2 - Rotting Flesh
The above is a great video on how to apply liquid latex. I haven't tried it yet, but will post a video once I do. Here are the supplies that are suggested in the video (links are to Amazon, but you can probably buy them other places as well):
Liquid Latex Ben Nye 8oz Bottle
Professional Makeup Wheels Ben Nye Master Bruise Wheel

Creme Color Liners Ben Nye Steel Grey

F/X Creme Colors Sallow Green

Translucent Powder Shaker Bottles 3.0oz Ben Nye Neutral Set
 (or Baby Powder or Corn Starch)
STIPPLE SPONGE 2-Pack Snazaroo Face Painting Sponge

Pampered Chef Citrus Peeler in Bright Orange Color

Toilet Paper
Cosmetic Wedge
Cosmetic Round
Powder Brush
Art Brushes
Thursday, July 14, 2011
Welcome to Forget The Candy . . . And RUN!
For as long as I can remember, I have always loved Halloween. Sure the candy was great, but my favorite part was running from house to house with my friends and wondering when (not if) someone or something was going to jump out and scare us. See, I always assumed other people loved Halloween as much as I did and I was terribly disappointed when Trick-or-Treating would end without someone playing a "trick" on me and my friends.
When I was too old (by local laws) to go Trick-or-Treating anymore, I just couldn't give up the holiday. So, I started setting up little Tricks around my front yard for the other kids. It started out simple - a homemade ghost on fishing line run from my upstairs window to the top of a tree across the driveway. But since that didn't really scare anyone I quickly progressed to Halloween makeup, spooky music, and props like "severed legs" and fake chainsaws. My Senior Year in High School I even made my girlfriend (can you believe it, she still ended up marrying me years later) join in on the fun and play the part of the bloodied victim. I knew I was on to something when my mom called me at college the next year and said that all of the kids were asking where I was as they collected their candy - without any Tricks.
Many years later, and with a kid of my own, I have gotten back to creating that fun anticipation for the neighborhood kids and spend a significant amount of time each year planning, building, and executing a Halloween theme. Throw in an annual Halloween party and you can see why I decided to start this blog... Stay tuned for ideas on music, costumes, makeup, party and lawn decorations, recipes, book and product reviews, event calendars, and many more things.
When I was too old (by local laws) to go Trick-or-Treating anymore, I just couldn't give up the holiday. So, I started setting up little Tricks around my front yard for the other kids. It started out simple - a homemade ghost on fishing line run from my upstairs window to the top of a tree across the driveway. But since that didn't really scare anyone I quickly progressed to Halloween makeup, spooky music, and props like "severed legs" and fake chainsaws. My Senior Year in High School I even made my girlfriend (can you believe it, she still ended up marrying me years later) join in on the fun and play the part of the bloodied victim. I knew I was on to something when my mom called me at college the next year and said that all of the kids were asking where I was as they collected their candy - without any Tricks.
Many years later, and with a kid of my own, I have gotten back to creating that fun anticipation for the neighborhood kids and spend a significant amount of time each year planning, building, and executing a Halloween theme. Throw in an annual Halloween party and you can see why I decided to start this blog... Stay tuned for ideas on music, costumes, makeup, party and lawn decorations, recipes, book and product reviews, event calendars, and many more things.
Subscribe to:
Posts (Atom)